Introduction:
In the realm of network administration, understanding IP Routing and routing protocols is fundamental, as highlighted in CCNA studies. Routing is essentially the mechanism of directing data across networks by determining the optimal path from numerous available routes. Routers are the dedicated devices that manage traffic flow between different subnets or networks. However, for smaller-scale networks, a Windows Server 2019 can adeptly take on the role of IP forwarding and LAN routing.
This guide provides a comprehensive, step-by-step walkthrough on how to configure LAN Routing on Windows Server 2019, transforming your server into an efficient router for your local network.
Understanding the Test Environment for LAN Routing
Note: This guide utilizes a practical test lab environment set up in VirtualBox to demonstrate the configuration process.
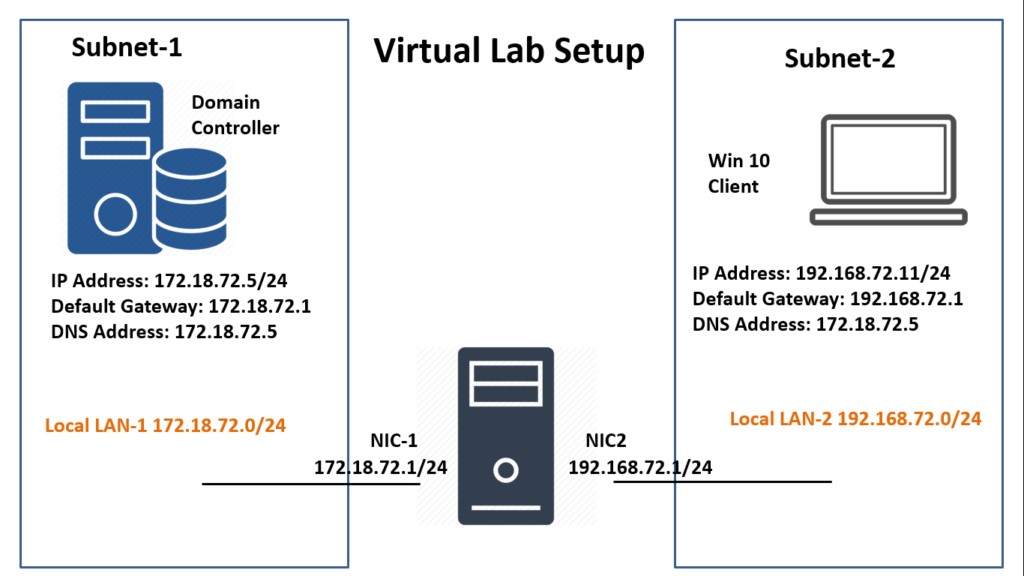
Our test lab consists of the following virtual machines:
- WS2K19-DC01: This machine acts as the Domain Controller and DNS server. It is configured with the IP address 172.18.72.5/24.
- WS2K19-SRV02: This Windows Server 2019 machine will serve as our router. It is equipped with two Network Interface Cards (NICs):
- NIC-1: IP Address 172.18.72.1/24
- NIC-2: IP Address 192.168.72.1/24
- WS10-1903: A Windows 10 client machine with the IP address 192.168.72.5/24.
The diagram below illustrates the complete IP configuration for each virtual machine within our test lab environment.
Before proceeding with the configuration, it’s crucial to verify network connectivity. Initially, attempt to ping the Domain Controller (172.18.72.5) from the Windows 10 client machine. This pre-configuration check helps to establish a baseline before implementing LAN routing.
Installing the LAN Routing Service on Windows Server 2019
The LAN routing functionality is a role service within the Remote Access Server role. To begin, we need to install the Remote Access server role on our designated router, WS2K19-SRV02. Follow these steps using the Server Manager Console:
-
Initiate Role and Feature Installation: Open Server Manager, then click on Manage in the top right corner, and select Add Roles and Features to start the Add Roles and Features Wizard.
-
Bypass Preliminary Information: On the ‘Before you begin’ page of the wizard, review the introductory information and click Next to proceed.
-
Choose Installation Type: Select Role-based or feature-based installation as the installation type and then click Next. This option allows us to install specific roles and features on the server.
-
Server Selection: Ensure that Select a server from the server pool is selected, and choose your local server (WS2K19-SRV02) from the list. Click Next to continue the installation on the chosen server.
-
Select Server Roles: In the ‘Select server roles’ page, find and check the box next to Remote Access. This selects the Remote Access Server role. Click Next to move to the features selection.
-
Proceed to Features: On the ‘Select features’ page, no additional features are required for basic routing, so simply click Next to proceed.
-
Review Remote Access Role Information: The ‘Remote Access’ page provides a summary of the role. Review this information and click Next to continue to the role services selection.
-
Select Routing Role Service: On the ‘Select role services’ page, locate and check the Routing checkbox. This is the essential role service for enabling LAN routing capabilities on Windows Server 2019.
-
Add Required Features: Upon selecting Routing, a pop-up dialog will appear, prompting you to add required features for LAN Routing. Click Add Features to include these dependencies and then click Next.
-
Confirmation and Next: Review your selections on the ‘Web Server Role (IIS)’ page (if it appears, it might be due to dependencies) and click Next. Otherwise, proceed directly to the confirmation page by clicking Next on the previous screen.
-
Initiate Installation: On the ‘Confirmation’ page, review all selected roles and features, and then click Install to begin the installation process of the Remote Access Server role with the Routing role service.
-
Complete Installation: Once the installation is complete, the wizard will display a ‘Installation succeeded’ message. Click Close to exit the Add Roles and Features Wizard.
Configuring and Enabling LAN Routing on Windows Server 2019
After successfully installing the Routing role service, the next step is to configure and enable LAN Routing. This is done through the Routing and Remote Access console, accessible from Server Manager.
-
Open Routing and Remote Access Console: In Server Manager, click on Tools in the top right corner and select Routing and Remote Access to open the management console.
-
Configure and Enable Routing and Remote Access: In the Routing and Remote Access console, locate your server name (WS2K19-SRV02), right-click on it, and select Configure and Enable Routing and Remote Access. This action launches the Routing and Remote Access Server Setup Wizard.
-
Welcome to Setup Wizard: The welcome page of the wizard provides a brief overview. Read through it and click Next to proceed with the configuration.
-
Choose Custom Configuration: On the ‘Configuration’ page, select Custom Configuration. This option allows for manual selection of routing features. Click Next to continue.
-
Select LAN Routing Feature: On the ‘Custom Configuration’ page, check the box next to LAN routing. This specifies that we are configuring the server for local area network routing. Click Next.
-
Complete the Wizard: Click Finish on the final page to apply the configuration settings.
-
Start Routing and Remote Access Service: A message box will appear, prompting you to start the Routing and Remote Access service. Click Start Service to activate the routing functionality.
Verifying the LAN Routing Configuration
With LAN routing enabled on our Windows Server 2019, it’s crucial to verify that the configuration is working as expected.
Before testing, ensure that the Windows Firewall on WS2K19-SRV02 is configured to allow ICMP packets, which are used by the ping utility. You might need to create an inbound rule to allow ICMP traffic or temporarily disable the firewall for testing.
Refer to guides on creating ICMP exception rules in Windows Firewall for detailed instructions.
Once the firewall is correctly configured, proceed to the Windows 10 client machine and open Command Prompt.
First, execute the following command to test connectivity to the Domain Controller: ping 172.18.72.5.
After successful configuration, you should now receive ICMP replies from the Domain Controller, confirming that LAN routing is in place and functioning correctly.
Next, use the tracert 172.18.72.5 command to trace the route to the Domain Controller. This command will show the path packets take to reach the destination.
The traceroute result should indicate that the packets are first routed through the Windows Server 2019 router (WS2K19-SRV02) before reaching the Domain Controller, demonstrating that our Windows Server is now effectively routing traffic between the two network segments.
Conclusion
This guide has provided a detailed, step-by-step process for enabling and configuring LAN Routing on Windows Server 2019. By following these instructions, you can effectively utilize a Windows Server as a software router in smaller network environments, enhancing network connectivity and management.
Thank you for reading this Windows Server Routing Guide.
Related Articles:
Post Views: 7,624