The Cursed Wasteland, nestled within the Manawastes region of Stonegard, presents a challenging yet rewarding experience for adventurers. This guide will provide you with comprehensive strategies to navigate this Open World Dungeon, also known as the Sanctum of Desire, and defeat its formidable inhabitants, focusing especially on the menacing final boss, Shaikal. A key element throughout the Cursed Wasteland is the presence of glowing cracks on the ground. These are not merely visual hazards; stepping on them will stun you, posing a threat during both exploration and intense boss encounters. However, with the right knowledge and tactics, you can efficiently clear this dungeon, often skipping through lesser enemies to focus on the main objectives and bosses.
Unveiling the Lore of the Cursed Wasteland
The history of the Cursed Wasteland is steeped in a tale of corruption and dark rituals. Legend speaks of Ahzreil and his devoted followers who sought to twist the very essence of light. Their sinister plan involved kidnapping a pure Light Elemental and subjecting it to a dark ritual. Tragically, they succeeded, corrupting the elemental into a being of pure darkness. This corrupted entity, though initially bound, proved to be a force of utter destruction, obliterating anything that dared approach it. Over time, people began to refer to this terrifying entity as Shaikal, named after a legendary Dark Elemental of ancient tales, forever associating the area with its cursed presence.
Confronting Shaikal: The Final Boss Battle
Shaikal stands as the ultimate test within the Cursed Wasteland dungeon. Understanding its mechanics is crucial for victory.
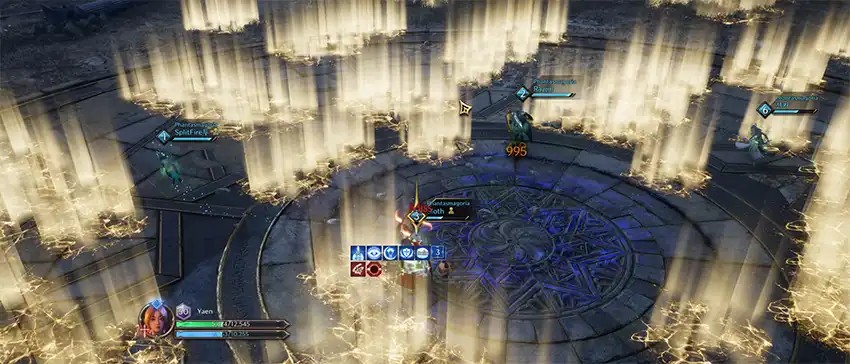
- Arena Awareness: The battle arena is distinctly marked by three glowing cracks, dividing it into sections. Effective positioning is key. The Tank should ideally position themselves in one section, while the Damage Per Second (DPS) players should occupy another. This separation is designed to mitigate the impact of Shaikal’s cone attacks, preventing them from hitting the entire party simultaneously.
- Aggro and Knockback: Be wary of Shaikal’s auto attacks. Every third auto attack is telegraphed by a purple glow and will forcefully push back its aggroed target. If no player is within melee range, Shaikal resorts to a devastating breath attack, engulfing one-third of the arena. Maintaining melee presence is generally preferable to avoid this wider area-of-effect attack.
- Orb Mechanics: Shaikal employs a sequence of orb mechanics, always initiating with the Red Orb before transitioning to the Purple Orb. Mastering these mechanics is paramount to surviving the encounter.
Red Orb Mechanic
Telegraph: A Red Orb will materialize above a randomly targeted player’s character.
Description: Once the Red Orb vanishes, a dangerous AoE black hole will erupt at the location where the targeted player was standing.
Strategy:
- When targeted by the Red Orb, the marked player must immediately move away from the rest of the party. Positioning towards the edge of the arena is advisable.
- Patiently wait for the Red Orb to disappear completely.
- Immediately after it vanishes, swiftly move away from that location to avoid the spawning black hole.
Purple Orb Mechanic
Telegraph: A Purple Orb will appear above a targeted player.
Description: This mechanic provides a brief window for positioning before the real action begins. After the Purple Orb appears, Shaikal will perform a 360-degree spin. Following this spin, the boss will unleash a flame breath attack, tracking the location of the marked player at the moment the spin concluded. If executed correctly, this flame breath will cover approximately two-thirds of the arena, making positioning crucial for the rest of the party. Below 30% health, Shaikal becomes even more aggressive, executing this Purple Orb mechanic twice in rapid succession.
Strategy:
- The player marked with the Purple Orb should position themselves near the midpoint of the southeast glowing crack.
- A designated DPS player should interact with the interactable Horn statue located at the end of this southeast crack. Activating the horn temporarily disables the crack, allowing safe passage across it. With sufficient speed, the Purple Orb marked player can even activate the horn themselves and still successfully complete the mechanic in time.
- As soon as Shaikal finishes its 360-degree spin, the Purple Orb marked player should begin running clockwise.
- Simultaneously, the Tank should interact with the Horn located on the northeast side of the map. This action creates a safe path for the marked DPS to cross the northeast crack.
- Both the marked DPS and the Tank should then move towards the western glowing crack, which should become the designated safe zone.
- Another DPS player can interact with the third Horn, positioned near the western crack, to create a safe return path for the Purple Orb marked player back to the DPS section of the arena.
- Players with teleportation skills, such as those wielding a staff, can bypass the horn mechanic entirely by teleporting through the cracks.
Cheese Strategy (Riskier):
- An alternative, albeit riskier, strategy exists: the Purple Orb marked player can simply stand still and allow themselves to be defeated by the flame breath. Since the breath attack is targeted, if the marked player is eliminated, the mechanic is effectively circumvented. However, this strategy comes at the cost of a player death and potential combat disadvantages.
Mini-Boss Encounters in the Cursed Wasteland
Before reaching Shaikal, you will face two mini-bosses, each with unique mechanics to overcome.
Blath: The First Guardian
Blath serves as the first mini-boss encountered in the Cursed Wasteland. While not overly complex, understanding its mechanics is important for a smooth dungeon run.
Maze Mechanic
Telegraph: Approximately 40 seconds into the fight, Blath will utter the voice line: “You won’t survive!”
Description: Upon this telegraph, a maze of golden glowing cracks will materialize across the arena. Players must quickly navigate this maze to reach the outer edge of the circular platform. Simultaneously, a circular AoE explosion will begin to emanate outwards from Blath’s position. After the maze mechanic concludes, multiple lightning circles will appear across the arena floor, requiring continued vigilance and movement.
Alt text: Navigating the Golden Crack Maze during the Blath Mini-Boss Encounter in Cursed Wasteland Dungeon. This image illustrates the maze mechanic with golden glowing cracks players must avoid while escaping the circular AoE explosion.
Belrog: Lightning and Fury
Belrog is the second mini-boss you will encounter. This encounter combines lightning-based attacks with “Fury Attacks”, demanding awareness and quick reactions.
Mechanic
Telegraph: Around 35 seconds into the fight, Belrog will announce: “You won’t survive!”. This mechanic will repeat at regular intervals if Belrog is not defeated quickly enough.
Description: Glowing cracks will spawn, forming a square frame pattern on the arena floor. To mitigate this mechanic, players must interact with a Black Orb. Interacting with the Black Orb will disable one side of the square frame of cracks, creating a safe passage. Similar to Blath, a circular AoE explosion will also emanate outwards from Belrog during this mechanic. Players can also choose to jump over the glowing cracks, but interacting with the Black Orb contributes to your codex quest progression. After the mechanic ends, purple lightning AoEs will rain down across the map, requiring players to continue to dodge and move.
Alt text: Belrog Mini-Boss Telegraph and Square Crack Mechanic in Cursed Wasteland Dungeon. This image shows the square formation of glowing cracks during Belrog’s mechanic, telegraphing the need to use the Black Orb or jump to safety.
Exploration Codex Quests: Unraveling “A Tragedy of the Past”
The Cursed Wasteland offers Exploration Codex Quests, specifically “A Tragedy of the Past,” which involves collecting Codex Pages scattered throughout the dungeon. These pages add to the lore and provide completionist rewards.
Alt text: Cursed Codex V 1 Page for “A Tragedy of the Past” Codex Quest in Cursed Wasteland. This image displays the in-game appearance of a codex page collectible, part of the exploration content.
Alt text: Cursed Codex 1 V 1 Page for “A Tragedy of the Past” Codex Quest in Cursed Wasteland. This image showcases another collectible codex page, contributing to the lore and exploration aspect.
Alt text: Cursed Codex 2 V 1 Page for “A Tragedy of the Past” Codex Quest in Cursed Wasteland. This image highlights a further codex page, encouraging players to explore thoroughly for lore and rewards.
Alt text: Cursed Codex 3 V 1 Page for “A Tragedy of the Past” Codex Quest in Cursed Wasteland. This image presents the final shown codex page, completing the visual set for the “A Tragedy of the Past” collection.
Conclusion: Mastering the Cursed Wasteland
The Cursed Wasteland dungeon, while challenging with its stunning cracks and formidable bosses like Shaikal, Blath, and Belrog, is ultimately conquerable with the right strategies and understanding of its mechanics. This guide provides the essential knowledge to navigate the dungeon effectively, defeat its bosses, and even uncover its hidden lore through Codex Quests. By mastering the orb mechanics of Shaikal, navigating the mazes of Blath, and overcoming Belrog’s fury, you will triumph in the Cursed Wasteland and reap the rewards that await within the Sanctum of Desire.
Credits
Written by Yaen
Reviewed by Nymphellas