Are you tired of confusing embroidery patterns with unclear diagrams? You’re not alone! Many crafters struggle to learn embroidery stitches from poorly illustrated guides. This comprehensive Embroidery Stitch Guide is designed to be your go-to resource, offering easy-to-follow photos, clear diagrams, and helpful videos to ensure you master each stitch, regardless of your learning style. Whether you’re a complete beginner or looking to expand your stitch repertoire, this guide will provide you with the foundational knowledge and techniques you need to bring your embroidery projects to life.
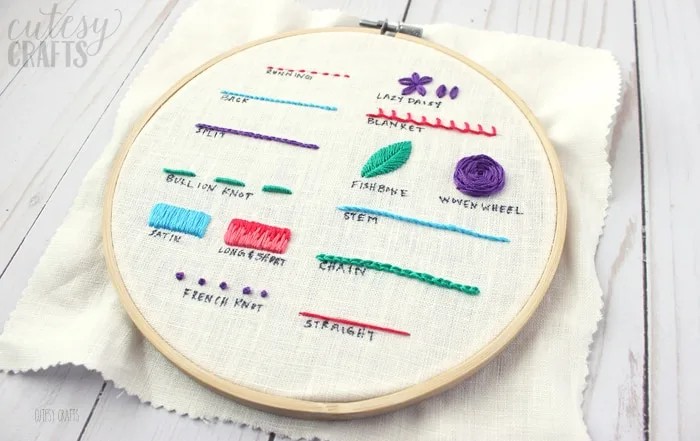
Embroidery stitch guide sampler showcasing a variety of hand embroidery stitches, perfect for beginners and experienced crafters.
Detailed embroidery sampler featuring diverse stitch patterns, ideal for practicing different embroidery techniques and enhancing your skills.
Exploring Different Types of Embroidery Stitches
Embroidery stitches are incredibly versatile, each serving unique purposes and contributing to the overall texture and design of your embroidered piece. The world of embroidery stitches is vast and exciting, offering endless creative possibilities. Understanding the categories of stitches can help you choose the right ones for your projects and expand your embroidery horizons.
- Line Stitches: These stitches are the foundation of outlining and creating defined shapes in embroidery. They are perfect for adding details, lettering, and delicate lines to your designs. Examples include the backstitch, running stitch, and split stitch.
- Fill Stitches: When you need to cover areas with color and texture, fill stitches are your best friend. They create solid or shaded areas within your design, adding depth and visual interest. The satin stitch and long & short stitch are popular choices for filling.
- Knot Stitches: Knots add dimension and texture to embroidery. They can be used to create dots, accents, or even lines, providing a raised element to your work. French knots and colonial knots are classic examples.
- Decorative Stitches: This broad category encompasses stitches that create patterns, shapes, and textures beyond simple lines or fills. These stitches are often used to embellish designs, create floral motifs, decorative borders, and add unique flair to your embroidery. Examples include the lazy daisy stitch, woven wheel stitch, and feather stitch.
Mastering Basic Embroidery Stitches: A Step-by-Step Guide
Let’s delve into some essential basic embroidery stitches that every beginner should learn. These stitches form the building blocks for more complex embroidery techniques and are fundamental to a wide range of projects.
1. Running Stitch
The running stitch is the simplest embroidery stitch, perfect for creating dashed lines, borders, and quickly covering ground. It’s a great stitch to start with when learning hand embroidery.
Step-by-step image demonstrating the running stitch technique for hand embroidery, ideal for beginners learning basic stitches.
Steps:
- Bring your needle up through the fabric at point 1.
- Take the needle down through the fabric at point 2, a short distance away from point 1.
- Bring the needle back up at point 3, maintaining a consistent stitch length and spacing.
- Repeat steps 2 and 3 to create a line of running stitches.
Watch the video tutorial: How to do a Running Stitch
Example of a completed running stitch line in embroidery, showcasing even stitch length and spacing, perfect for outlining designs.
2. Backstitch
The backstitch is a strong, solid line stitch ideal for outlining shapes, lettering, and creating fine details. It produces a continuous line, making it more defined than the running stitch.
Image tutorial showing how to create a backstitch in hand embroidery, a fundamental stitch for outlines and lettering.
Steps:
- Bring the needle up at point 1 and down at point 2.
- Bring the needle up again at point 3, which is a short distance ahead of point 2.
- Insert the needle back down at point 1, meeting the end of the previous stitch.
- Repeat steps 2 and 3, always bringing the needle back to meet the previous stitch.
Watch the video tutorial: How to Backstitch
Close-up of a backstitch line in embroidery, demonstrating its solid and continuous appearance, ideal for detailed work.
3. Split Stitch
The split stitch is another excellent line stitch, producing a slightly textured and rope-like effect. It’s often used for outlining and creating thicker lines with visual interest.
Visual guide demonstrating the split stitch technique in embroidery, known for its textured and rope-like appearance.
Steps:
- Bring the needle up at point 1 and down at point 2.
- Bring the needle up at point 3, positioning the needle to split the threads of the previous stitch in half from the center.
- Take the needle down at point 4, a short distance ahead of point 3.
- Repeat steps 2 and 3, consistently splitting the previous stitch.
Watch the video tutorial: How to do a Split Stitch
Example of a split stitch line in embroidery, highlighting its textured effect created by splitting the thread of each previous stitch.
4. Stem Stitch
The stem stitch is a versatile line stitch perfect for creating smooth curves and outlines, especially for stems, vines, and flowing lines in floral and nature-inspired designs.
Instructional image demonstrating the stem stitch for embroidery, ideal for creating smooth curved lines and outlines in designs.
Steps:
- For the first stitch, bring the needle up at point 1 and down at point 2.
- Bring the needle up at point 3, positioned between points 1 and 2.
- For subsequent stitches, bring the needle down at point 4, and up at point 2. Crucially, ensure the needle consistently emerges on the same side of the previous stitch to maintain a uniform line.
Watch the video tutorial: How to Stem Stitch
Close-up view of a stem stitch line in embroidery, showcasing its smooth and slightly angled appearance, perfect for floral stems and curved elements.
5. Satin Stitch
The satin stitch is a fill stitch used to cover areas completely with smooth, solid color. It creates a beautiful, lustrous surface and is often used for petals, leaves, and other solid shapes.
Step-by-step image guide for creating a satin stitch in embroidery, a popular fill stitch for smooth and solid color areas.
Steps:
- Bring the needle up at point 1 and down at point 2, spanning the area you want to fill.
- Bring the needle back up at point 3, very close to the previous stitch, on the opposite side of the shape.
- Continue placing stitches closely together, working back and forth across the entire shape until it is completely filled. Keep stitches parallel and even for a smooth satin finish.
Watch the video tutorial: How to do a Satin Stitch
Example of a satin stitch fill in embroidery, demonstrating its smooth, glossy, and densely filled appearance within a shape.
6. French Knot
French knots are decorative knots that add texture and dimension to embroidery. They are perfect for creating dots, flower centers, and adding delicate accents to your designs. While slightly trickier to learn initially, they are a rewarding stitch to master.
Visual instructions on how to make a French knot in embroidery, a decorative knot stitch for adding texture and dimension.
Steps:
- Bring your needle up through the fabric at point 1.
- Wrap the thread around the needle twice (or more for larger knots), holding the thread taut with your non-dominant hand.
- Turn the needle tip towards the point where the thread emerged (point 1), and insert the needle down at point 2, very close to point 1, while still holding the thread taut.
- Slowly pull the excess thread through the fabric, guiding the knot down to sit neatly on the surface.
Watch the Video tutorial: How to do a French Knot
Close-up of French knots in embroidery, highlighting their small, round, and textured appearance, ideal for adding accents and detail.
Expanding Your Stitch Library: More Embroidery Stitches for Beginners
Once you’ve mastered the basic stitches, you can explore a wider range of embroidery stitches to add even more creativity and complexity to your projects. Here are some additional beginner-friendly stitches to try:
- Straight Stitch – A single, straight stitch, incredibly versatile for details and accents. Watch the video: How to do a Straight Stitch
Straight stitch diagram for hand embroidery, demonstrating its simplicity and versatility for various design elements.
- Chain Stitch – A decorative line stitch forming a chain-like appearance, great for borders and outlines. Watch the video: How to do a Chain Stitch
Chain stitch visual guide for embroidery, showcasing its looped and chain-like texture, perfect for decorative lines and borders.
- Lazy Daisy Stitch – Also known as detached chain stitch, used to create individual petal shapes, perfect for flowers. Watch the video: How to do a Lazy Daisy Stitch
Lazy daisy stitch tutorial image for embroidery, illustrating its use in creating petal and leaf shapes for floral designs.
- Fishbone Stitch – A textured fill stitch resembling a fishbone, ideal for embroidering leaves and feathers. Watch the video: Embroider Leaves with the Fishbone Stitch
Fishbone stitch example for embroidering leaves, demonstrating its textured fill and realistic leaf vein appearance.
- Blanket Stitch – Also known as buttonhole stitch, used for decorative edges and borders. Watch the video: How to do a Blanket Stitch
Blanket stitch instructions for embroidery, showcasing its use for creating neat and decorative border edges on fabric.
- Woven Wheel Stitch – Creates beautiful rose-like flowers with a woven texture. Watch the video: How to do a Woven Wheel Stitch
Woven wheel stitch tutorial for embroidery flowers, illustrating the process of creating textured and dimensional floral motifs.
- Fly Stitch – A versatile stitch resembling a ‘V’ or ‘Y’ shape, used for scattered fills, borders, and abstract designs. Watch the Video: How to do the Fly Stitch
Fly stitch diagram for hand embroidery, demonstrating its V or Y shape and versatility for various design elements and fills.
- Seed Stitch – Tiny straight stitches scattered to create a textured fill or subtle shading. Watch the video: How to do the Seed Stitch
Seed stitch tutorial image for embroidery, showing its use in creating subtle texture and shaded areas with scattered small stitches.
- Colonial Knot – Similar to French knot but with a slightly different wrapping technique, creating a more defined knot. Watch the video: How to Make a Colonial Knot
Colonial knot example in embroidery, highlighting its defined and slightly larger appearance compared to French knots, used for texture.
- Buttonhole Wheel – Creates decorative circular motifs resembling wheels with buttonhole stitch edges. Watch the video: How to Make a Buttonhole Wheel
Buttonhole wheel stitch diagram for embroidery, illustrating its circular shape and decorative buttonhole stitch edges for unique motifs.
- Feather Stitch – An open, airy line stitch with a branching effect, great for decorative borders and nature-inspired designs. Watch the video: How to do the Feather Stitch
Feather stitch tutorial image for embroidery, showing its open, branching design, ideal for decorative borders and nature-themed patterns.
- Long and Short Stitch – A fill stitch used for shading and creating smooth gradations of color. Watch the video: How to Long and Short Stitch
Long and short stitch example in embroidery, demonstrating its use in creating smooth color gradations and shading effects in fill areas.
Venturing Beyond: Uncommon Embroidery Stitches to Explore
For those looking to take their embroidery skills to the next level, here are some less common yet fascinating embroidery stitches to experiment with:
- Bullion Knot – An elongated knot that can be used to create lines, shapes, and textured elements. Watch the video: How to do a Bullion Knot
Bullion knot diagram for hand embroidery, illustrating its elongated and textured appearance, suitable for advanced stitchwork and unique details.
- Threaded Running Stitch – A running stitch embellished with a second thread woven through it, adding texture and dimension to lines. Watch the video: How to do a Threaded Running Stitch
Threaded running stitch example for embroidery, showcasing the added texture and dimension from weaving a second thread through the running stitches.
- Whipped Back Stitch – A backstitch enhanced by wrapping or “whipping” another thread around it, creating a thicker, raised line. Watch the video: How to do a Whipped Back Stitch
Whipped back stitch tutorial image for embroidery, demonstrating the whipped thread effect that adds thickness and a raised texture to backstitch lines.
- Double Threaded Back Stitch – Similar to whipped back stitch but using two threads simultaneously while creating the backstitch itself for a bolder line. Watch the video: How to do a Double Threaded Back Stitch
Double threaded back stitch example in embroidery, showing the thicker and bolder line achieved by using two threads simultaneously in the backstitch.
- Couching Stitch – Used to secure thicker threads or cords to the fabric surface with small stitches. Watch the video: How to do the Couching Stitch
Couching stitch diagram for hand embroidery, illustrating its technique of securing thicker threads or cords onto the fabric with small holding stitches.
- Danish Knot – Another type of decorative knot, similar to colonial and French knots, offering a slightly different texture. Watch the video: How to do a Danish Knot
Danish knot example in embroidery, showcasing its unique texture and appearance among decorative knot stitches, adding dimension to designs.
- Bullion Knot Rose – A technique using bullion knots to create beautiful and intricate rose shapes. Watch the video: How to Embroider a Rose with Bullion Knots
Bullion knot rose tutorial image for embroidery, demonstrating the creation of detailed and textured rose motifs using bullion knots.
- Looped Blanket Stitch – A variation of the blanket stitch with added loops, often used to create decorative floral edges. Watch the video: How to Make a Looped Blanket Stitch Flower
Looped blanket stitch flower example for embroidery, showing its use in creating floral edges and decorative borders with looped details.
- Turkey Stitch – A textured loop stitch used to create fluffy or fringed effects, often for animal fur or textured elements. Watch the video: How to do the Turkey Stitch
Turkey stitch tutorial image for embroidery, illustrating its looped and fringed texture, ideal for creating fluffy or textured surfaces in designs.
- Herringbone Stitch – A decorative stitch creating a criss-cross pattern, often used for borders, bands, and textured fills. Watch the video: How to do the Herringbone Stitch
Herringbone stitch example in embroidery, showcasing its distinctive criss-cross pattern, suitable for decorative borders, bands, and textured areas.
- Chevron Stitch – A zigzag line stitch, versatile for borders, geometric patterns, and decorative lines. Watch the video: How to do the Chevron Stitch
Chevron stitch diagram for hand embroidery, demonstrating its zigzag line pattern, perfect for geometric designs and decorative linear elements.
Frequently Asked Questions About Hand Embroidery Stitches
What is the easiest embroidery stitch for beginners?
The running stitch is undoubtedly the easiest embroidery stitch to learn. It consists of simple, evenly spaced straight stitches and is used in both hand embroidery and basic sewing. Following closely behind in terms of ease is the backstitch, another fundamental stitch for beginners.
How many basic embroidery stitches are there to learn?
There are generally considered to be six basic embroidery stitches that form the foundation of hand embroidery. These essential stitches are: the running stitch, backstitch, split stitch, stem stitch, satin stitch, and French knots. Mastering these will allow you to tackle a wide variety of embroidery projects.
Which embroidery stitch is considered the most popular?
The satin stitch holds the title of the most popular embroidery stitch. Its versatility in filling areas with solid color makes it a favorite in both machine and hand embroidery. The smooth, lustrous finish of the satin stitch adds a professional and polished look to embroidered designs.
Approximately how many different types of hand embroidery stitches exist?
The exact number of hand embroidery stitches is difficult to pinpoint, but it’s estimated that there are at least 300 different stitches in existence. Throughout history and across various cultures, countless unique hand stitching styles have emerged, making it nearly impossible to catalog them all comprehensively. This vast variety is part of what makes embroidery such a rich and endlessly creative craft.
Free Embroidery Sampler Patterns to Practice!
To practice and perfect these embroidery stitches, consider using free embroidery sampler patterns. Embroidery samplers are excellent learning tools and provide a handy reference guide as you work on other embroidery projects. Click on the links below to access free sampler patterns and start stitching:
- Free Embroidery Sampler Pattern 1
- Embroidery Stitch Sampler 2 Pattern
Embroidery stitch guide tutorial sampler, showcasing various stitches and techniques, perfect for practicing and improving embroidery skills.
Detailed embroidery sampler pattern, featuring a range of stitches for practice, ideal for beginners to advanced embroiderers to enhance technique.
What’s your favorite embroidery stitch from this guide? Many embroiderers are drawn to the woven wheel stitch for its beautiful floral creations! If you found this embroidery stitch guide helpful, be sure to explore our How to Embroider for Beginners series for more in-depth tutorials and beginner-friendly projects.
You Might Also Like: (This section can link to related articles on conduct.edu.vn if available)