In Europa Universalis IV (EU4), especially when playing as a Japanese Daimyo aiming to unite Japan and forge a powerful nation, the early game is absolutely crucial. Setting a strong foundation from the outset can significantly impact your campaign’s success, particularly when it comes to efficiently progressing through your mission chains and unlocking powerful national ideas and bonuses. One of the most effective strategies to kickstart your campaign is mastering the art of early rival selection and leveraging the “Humiliate Rival” casus belli (CB). This guide will walk you through the optimal approach to choosing your initial rivals and exploiting them for a massive early game advantage, setting you firmly on the path to completing your Japanese mission tree.
Strategic Rival Selection for Early Game Mana
When you begin your EU4 campaign as a Japanese Daimyo, you’ll soon face the critical decision of choosing your rivals. However, resist the immediate urge to assign them. Patience is key here. The optimal time to assess and select your rivals is around November 25th. Why wait? Because by this date, the political landscape has somewhat settled, and you’ll have a clearer picture of which potential rivals are isolated and vulnerable.
In most scenarios, your initial pool of potential rivals will be fairly consistent. Notably, Isshiki will almost always be presented as an option. This is advantageous, as Isshiki frequently ends up diplomatically isolated by December 11th, lacking alliances and ripe for the picking. Your goal is to identify which among your potential rivals are friendless and represent the best targets for humiliation. While there are no guarantees in EU4 due to the dynamic nature of alliances, taking calculated risks is necessary to secure the valuable “Humiliate Rival” CB by December 11th.
The Power of the Humiliate Rival Casus Belli
The “Humiliate Rival” CB is the cornerstone of this early game strategy. Unlike conquest CBs that necessitate claiming provinces and engaging in protracted wars that can draw the ire of the Shogun, the Humiliate CB offers a swift and efficient path to early game power. Our primary objective is not territorial expansion at this stage, but rather to declare opportunistic humiliation wars against weaker rivals as quickly as possible.
Instead of aiming for provinces, we will focus solely on the “Show Strength” peace deal. This invaluable option grants us a surge of 100 mana in each category: Administrative, Diplomatic, and Military. This influx of mana is transformative in the early game, allowing you to rapidly develop your provinces, embrace institutions, and unlock crucial military and economic technologies, all of which are vital for progressing through your mission chains and achieving your long-term objectives in Japan.
Isshiki is often the ideal first target because they are typically undefended. Even if they manage to secure an alliance, it’s usually with a weak One-Province Minor (OPM) like Kono or others that you can easily overcome after decisively defeating Isshiki’s main army. Remember to leave a small, partially damaged unit on Isshiki’s capital to prevent them from recruiting more troops, but ensure your unit is protected to avoid losing it and incurring unnecessary recruitment costs.
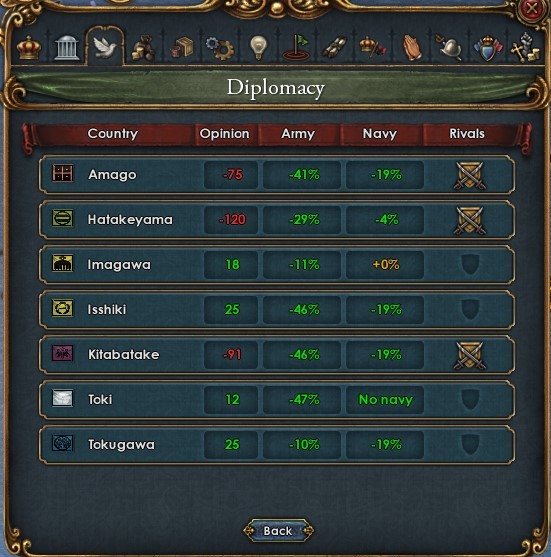 Isshiki often becomes isolated and an easy target for early humiliation wars in EU4.
Setting Up War Declaration Alerts
To capitalize on the fluid political situation in early Japan and identify opportune moments to strike, it’s crucial to configure your message settings to alert you when Daimyos declare war. While the “Best Guess” option might seem convenient, manually selecting each Daimyo is recommended. This ensures you are precisely informed when any Daimyo initiates hostilities, allowing you to react swiftly and potentially exploit the ensuing chaos.
Navigating the message settings is straightforward. Scroll down the list of nations until you reach Mongolia. Just above Mongolia, you’ll find Tsutsui. From Tsutsui upwards, meticulously click on each Daimyo until you reach Dai Viet. While this list doesn’t include So, they are generally inconsequential to your early game plans and can be safely ignored for now.
Considering Your Third Rival
After securing your first two rivals, the selection of your third rival warrants careful consideration. Depending on the available options, you may find yourself with less appealing choices. In many playthroughs, you’ll encounter a selection of your immediate neighbors, alongside less accessible options like Isshiki and Amago, who may not share a direct sea zone with you.
When evaluating potential third rivals, it’s generally wise to rule out Daimyos like Hatakeyama and Toki initially. While not entirely off-limits, these two-province minors possess capital forts that necessitate a significant siege force of around 9,000 troops to effectively assault. Engaging in prolonged sieges against fortified rivals early on can be time-consuming and divert resources from more immediate and profitable targets.
However, this doesn’t mean fortified rivals are entirely to be avoided. You should weigh the pros and cons of designating a fortified rival as your third. The primary drawback is their static nature; they are unlikely to expand or become easier targets in the short term. Conversely, they represent a consistent, albeit potentially more challenging, target for a future humiliation war once you’ve dealt with more vulnerable rivals.
Executing the Rival Strategy on December 11th
With the groundwork laid, unpause the game and pause again precisely on December 11th. Re-examine your potential rivals, taking into account any last-minute alliance shifts. Ideally, you’ll be presented with targets who remain isolated.
In an ideal scenario, like the example run mentioned earlier, you might find yourself exceptionally fortunate with rivals like Kitabatake, Imagawa, and Isshiki all lacking allies on December 11th. While there’s always a chance of alliances being forged at the last moment, this situation presents a prime opportunity to capitalize on their isolation.
In such favorable circumstances, declare war on Isshiki immediately and swiftly stackwipe their army. If fortune isn’t entirely on your side and they manage to field a larger force or secure an unexpected alliance, relentlessly pursue them until you achieve a decisive victory. Shortly after engaging Isshiki, you’ll likely observe other Daimyos opportunistically declaring war on other defenseless neighbors, further destabilizing the region and creating additional openings for you.
Depending on your strategic inclination, you can choose to manage one war at a time for focused gains, or you can assess if your second or third rivals are also vulnerable and initiate wars against them concurrently. A key tactic to remember is that as long as you maintain at least one unit on a capital province under siege, you retain control of the siege progress, even if allied or neutral troops join the siege and contribute to its advancement. However, avoid merging units during a siege, as this can potentially cede siege control to the next earliest arriving unit, which could be an AI and disrupt your war goals.
Post-Isshiki: Navigating Towards Amago or Rival #3
Following the swift subjugation of Isshiki, you’ll face a strategic crossroads: pursue Amago, or pivot to your third rival, or perhaps another vulnerable Daimyo altogether. Alongside the consistent vulnerability of Daimyos around December 11th, the situation of Kono is another recurring pattern in the early game unification of Japan. Kono stands out as a Daimyo with a notably strong naval focus, a characteristic shared by So and Mori. Unfortunately for Kono, they are almost invariably targeted by Hosokawa within the first year of the game, as their most frequent ally is Amago, who is also typically an easy target for other Daimyos.
Around this juncture, you’ll likely receive a notification signaling Hosokawa’s impending war declaration against Kono, which will inevitably draw Amago into the conflict. One strategic approach is to position your army near Amago’s territory, anticipating Hosokawa’s declaration on Kono. Once Kono has been occupied by Hosokawa and is unlikely to join the war against you, position your forces on Amago’s capital after decisively defeating their army. Subsequently, either Hosokawa or the opportunistic Yamana may declare war on Amago and potentially join your siege, further accelerating the process. Simultaneously, redeploy your two units from the Isshiki siege to Amago to reinforce your siege and secure control.
However, pursuing Amago (or even rivaling them initially) isn’t mandatory. You have the flexibility to shift your focus to another rival as opportunities arise. One potential drawback of relying on Hosokawa or Yamana to join your siege of Amago is that you become temporarily unable to assign new rivals while your army is committed to the prolonged siege. While not immediately detrimental, this can become problematic if you remain at war with Amago and have already concluded your humiliation wars against your other two rivals. Ultimately, the decision rests with you, but the potential reward is another quick “Show Strength” mana boost from Amago.
Author’s Note: Extensive testing has revealed that the AI is generally reluctant to join a player-controlled siege if the player is engaged in a humiliation war and is the first to arrive at the siege. For instance, if you declare war on Amago with the Humiliate CB, Hosokawa and Yamana will typically refuse to join your siege force if you are the first to position troops on Amago’s capital. However, if you were engaged in a war of conquest with a different CB, they would readily join. Furthermore, if you vacate the province, they will gladly take over the siege. This AI behavior largely negates the intended advantage of declaring on fortified capitals like Amago, Toki, or Hatakeyama with the expectation of AI assistance, especially if they lack other provinces for you to occupy.
Regardless of your chosen path after Isshiki, once the Isshiki siege concludes, resist the urge to immediately peace out. Instead, patiently await your navy to engage their fleet and accrue valuable naval tradition from the ensuing battle. Depending on your naval engagement luck and the overall trajectory of your campaign over the next two decades of warfare, you may or may not need to construct a substantial number of galleys. However, consistently waiting for the post-siege naval skirmish to maximize your naval tradition gain is a prudent practice. You likely won’t be able to completely destroy their navy, as they will often retreat to another Daimyo’s port for refuge, but the naval battle will still provide a significant boost to your naval tradition.
Summary: Mastering Early Rivals for Mission Chain Success
In summary, your typical early game strategy should prioritize Isshiki and Kitabatake as initial rivals, with Isshiki being the prime target for your very first war declaration. Occasionally, Isshiki might ally with Kono or Amago, or similar weak Daimyos. As previously mentioned, you can effectively manage wars against two OPM Daimyos simultaneously, provided you swiftly stackwipe one on the first day of the war (leveraging your maintenance slider and Oda’s starting national ideas for increased unit strength and reduced maintenance). In scenarios where Isshiki allies with Kono, a viable tactic is to patiently wait for Hosokawa to declare war on Kono and commence a siege of their province. This will often cause Kono to decline a defensive Call-to-Arms from Isshiki, leaving them isolated. If you prefer a more proactive approach, you can declare war on Isshiki and then lay siege to Kono’s capital after stackwiping Isshiki’s army. Kono will typically concede to a white peace without requiring a full siege of their capital.
Subsequently, assess your remaining rival options. If you were rivaled by a Daimyo destined for early extinction, such as Takeda (and occasionally Chiba) at the game’s start, prioritize them, even if they have secured an alliance. Uesugi’s aggressive expansion often makes these Daimyos vulnerable targets. Chiba, while sometimes appearing intimidating due to a triple alliance, is often allied with unreliable partners who are unlikely to join defensive wars against you. Remember, you can designate up to three rivals before initiating war and systematically address all three for maximum early game mana gains.
By strategically selecting and exploiting your early rivals using the Humiliate CB and “Show Strength” peace deal, you will amass a significant mana surplus in the crucial early years of your EU4 campaign. This mana advantage will accelerate your technological advancements, province development, and overall national growth, propelling you towards the successful completion of your Japanese mission chains and the ultimate goal of uniting Japan under your rule.