Homeownership comes with its share of exciting renovations and essential maintenance. While dreaming of kitchen makeovers and garden landscaping is fun, the reality often involves tackling smaller, but equally important, repairs to keep your home in top shape. One common annoyance many homeowners face is wobbly or misaligned sliding shower doors. If your shower doors are giving you trouble, swinging erratically or jumping off their tracks, the solution might be simpler than you think: replacing the Sliding Shower Door Bottom Guide.
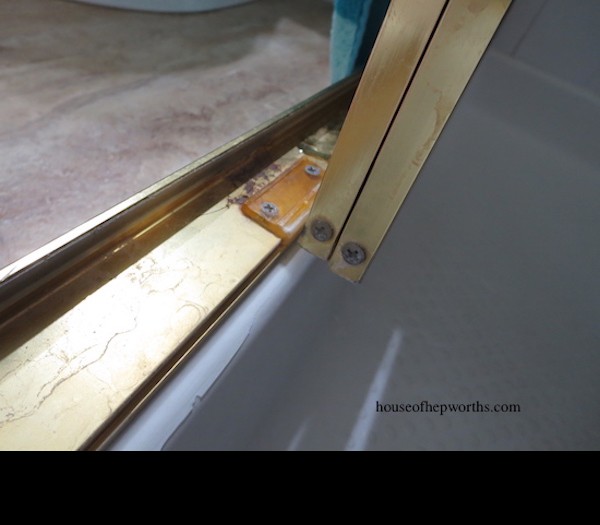
Often overlooked, the bottom guide plays a crucial role in ensuring your shower doors glide smoothly and stay in place. This small plastic component, located at the base of your shower doors, prevents them from swinging inwards or outwards, keeping them aligned within their track. When this guide breaks or wears down, it can lead to frustrating issues.
Let’s dive into how to easily replace this part and restore the smooth operation of your shower doors. It’s a quick and budget-friendly DIY fix that anyone can handle!
Identifying a Broken Shower Door Bottom Guide
Before we jump into the repair, let’s confirm that the shower door bottom guide is indeed the culprit. Here are a few signs that indicate it might be time for a replacement:
- Doors Swing Inward or Outward: If your shower doors swing freely beyond their intended path, it’s a primary indicator of a faulty bottom guide.
- Doors Jump Off Tracks: Without proper guidance, the doors may lose their alignment and slip off the upper or lower tracks.
- Visible Damage: Inspect the bottom guide itself. Look for cracks, breaks, or signs of wear and tear on the plastic.
- Noisy Operation: A damaged guide can cause the doors to rattle or make scraping noises as they slide.
If you’re experiencing any of these issues, chances are a new sliding shower door bottom guide is exactly what you need.
Step-by-Step Guide to Replacing Your Shower Door Bottom Guide
Replacing a sliding shower door bottom guide is a straightforward process that requires minimal tools and time. Here’s a simple step-by-step guide to help you through it:
Step 1: Removing the Old Guide
The first step is to remove the existing, broken guide. Typically, these guides are attached with screws.
- Locate the Screws: Examine the old shower door bottom guide. You should see one or two small screws holding it in place.
- Unscrew and Remove: Use a Phillips head screwdriver to carefully unscrew and remove these screws. Keep the screws in a safe place in case you need them later.
- Detach the Old Guide: Once the screws are removed, the old guide should detach easily. If it’s stuck, gently wiggle it until it comes loose.
Step 2: Preparing the New Guide
Now, let’s get the new tub and shower door bottom guide ready for installation. Most replacement guides come with adhesive strips for easy, drill-free mounting. However, for a more secure and long-lasting hold, especially in a humid environment like a shower, upgrading the adhesive is a smart move.
- Discard Provided Adhesive (Optional but Recommended): Many guides come with thin foam adhesive squares that can be unreliable, especially in wet conditions. For better adhesion, we recommend using Command Strips or similar heavy-duty, water-resistant adhesive strips.
- Apply Command Strips: Cut Command Strips to fit the back of your new shower door guides. Apply them firmly to the back surface of each guide.
- Remove Pull Tabs: Once the adhesive strips are applied, remove the red pull tabs, exposing the sticky side.
Step 3: Installing the New Guide
With the new guides prepped, it’s time to install them.
- Position the Guides: Carefully position the new sliding shower door bottom guides in the exact spot where the old one was located. You can use one or two guides side-by-side for enhanced stability, depending on your preference and the original setup.
- Press Firmly: Once you are happy with the positioning, press the guides firmly against the shower door track or surface. Hold pressure for about 30 seconds to ensure a strong bond with the Command Strips.
- Test the Doors: After installation, gently slide your shower doors back and forth to check if they are now moving smoothly and staying within their tracks.
Tips for a Smooth Installation and Long-Lasting Results
- Clean the Surface: Before installing the new guides, ensure the surface is clean and dry. Wipe away any soap scum, mildew, or debris to ensure the adhesive sticks properly.
- Consider Double Guides: Using two shower door bottom guides side-by-side, as shown, can offer extra stability and prevent wobbling, especially for heavier shower doors.
- Allow Adhesive to Cure: While Command Strips provide a strong hold, it’s best to avoid excessive force on the shower doors for a few hours after installation to allow the adhesive to fully cure and bond.
- Regularly Inspect: Periodically check your sliding shower door bottom guides for any signs of wear or damage. Replacing them proactively can prevent more significant issues down the line.
Conclusion
Replacing a sliding shower door bottom guide is a small fix that can make a big difference in the functionality and convenience of your bathroom. It’s an affordable and easy DIY project that eliminates wobbly doors, keeps your shower enclosure in good condition, and saves you from more costly repairs. So, if your shower doors are giving you trouble, don’t hesitate to tackle this simple solution and enjoy smoothly gliding doors once again!